To add content at scale, we allow you to add and update services via CSV. Frequently, users ask us for a template to upload services. Your file layout will vary depending on the language fields present in your account. The easiest way to create a template is to download a CSV from your account and clear out the content.
Step 1 - Verify your Language Fields
Please verify your language fields are set up the way you want them to appear in the Projects.
You can check the language fields under Settings > Content > Language Fields
The language fields create the "containers" for the language you will upload, so ensure they are correct before you proceed.
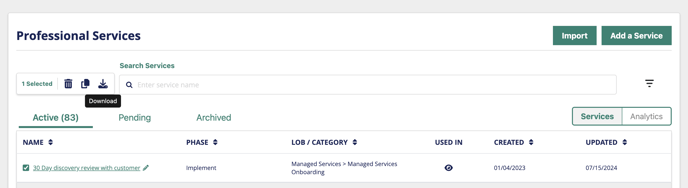
Step 2 - Download the CSV template from an existing service.
You can find your existing Services at Settings > Content under Professional and Managed Services. To download a CSV of a single service, use the checkboxes on the left side of the list of services to select a service, and then click the download icon at the top of the list.
When you open this file in Excel, it will have the content to create a template.
Note: The downloaded CSV does not contain every attribute available for import, just the most commonly used ones. You can add in additional columns and map them during import
Step 3 - Update an existing or create a new Service via CSV
Now let's take a closer look at the makeup of the downloaded CSV.
The platform reads the spreadsheet rows in the following pattern:
-
It knows it has encountered a new Service if the Subservice field is empty for a row. In the example, Row 2 has its subservice field empty, so the information for that row is interpreted to be information for the overall Service.

-
If the next row it encounters has a Subservice field and the Line of Business, Service Category, and Service information match, it will interpret that row as information about the first Subservice. In the above example, Row 3 contains a Subservice name. Column 1-4 information matches that of the service above, so it interprets that as the first Subservice of the Service.
-
It will follow this pattern, adding additional subservices, until it encounters the next row lacking a Subservice. The platform interprets that row as the beginning of a new Service. You can see in Row 9 of this example, there is no subservice, so the platform will understand that this is the beginning of a new service.

The columns in the sheet breakdown like so:
-
Line of Business/Sevice Category/Service Columns: The platform will attempt to match services by this unique combination of attributes. If a service does not match these three attributes, the platform will create a new one with the attributes defined in the sheet. The platform will create new Lines of Business and Service Categories as needed.
-
You can't update the Line of Business or Service Category of an existing Service as the platform will create a new service with the new LOB and SC values.
-
If you import a service with the same service name as an existing service but with a new Line of Business, the platform will create a new service with the appropriate information.
-
If you import a service that matches an existing service with all three attributes, the platform will update the existing service with any changes you make with other imported attributes.
-
-
Phases: The platform will attempt to match the value assigned to a Service via sheet. The imported service will have its Phase value left blank if none is found. The platform will not create new Phases via import. You can then align the service with an existing phase in the user interface after import
-
Resources: The platform will attempt to match the value assigned to a Service via CSV. If none is found, the platform will create a new resource and align that resource with the imported service. Resource names are case-sensitive, so be sure they match exactly.
-
Suggested Hours sets the unit hour for the service or subservice on Professional Services
-
The State column can define how users can use the content on import in the platform or to remove content.
-
The valid values for the state column are: active, pending, custom, deleted
-
If no state attribute is mapped, the service will be added to the platform in the pending state.
-
Users can use the deleted state to remove content from the platform. Setting a service/subservice to deleted will remove that content from the platform upon import.
-
-
Service Type allows you to differentiate between professional_services and managed_services
-
You can import Managed Services and Professional Services in the same sheet. The import function works the same whether initiated from the Professional Services or Managed Services screen.
-
If the Service Type is not defined as managed_services, the platform will assume you are importing a Professional Service.
-
If you have created a Managed Service, you can define the Billing Frequency as:
-
monthly
-
quarterly
-
yearly
-
-
The platform won't display a Managed Service's resource, Effort, and Phase information if you defined any.
-
-
Billing Frequency is defined for the service-level row only.
-
Subservices can't have a Phase, Service Type, or Billing Frequency different from the parent service.
-
Those values will be ignored for Subservices.
-
-
The Service Description column is where you can define the Service Description value for the service or subservice.
-
After the Service Description column, you will see columns for your Phases. In some of these columns, you may see some content. Except in specific circumstances, you can ignore these columns as they are a legacy function of the platform.
-
Language Field columns then follow the Service Description/Phase Columns, and you can enter appropriate information per service/subservice in those columns.
-
A few additional standard columns are available for import but are not exported. They are:
-
SKU: This column lets you define a SKU value for the service level that can be used in the platform
-
Service Price: This column lets you define a Service Price per Unit with a minimum quantity of 1 in a Variable Rate fashion.
-
Service Cost: This column lets you define a Service Cost per Unit with a minimum quantity of 1 in a Variable Rate fashion.
-
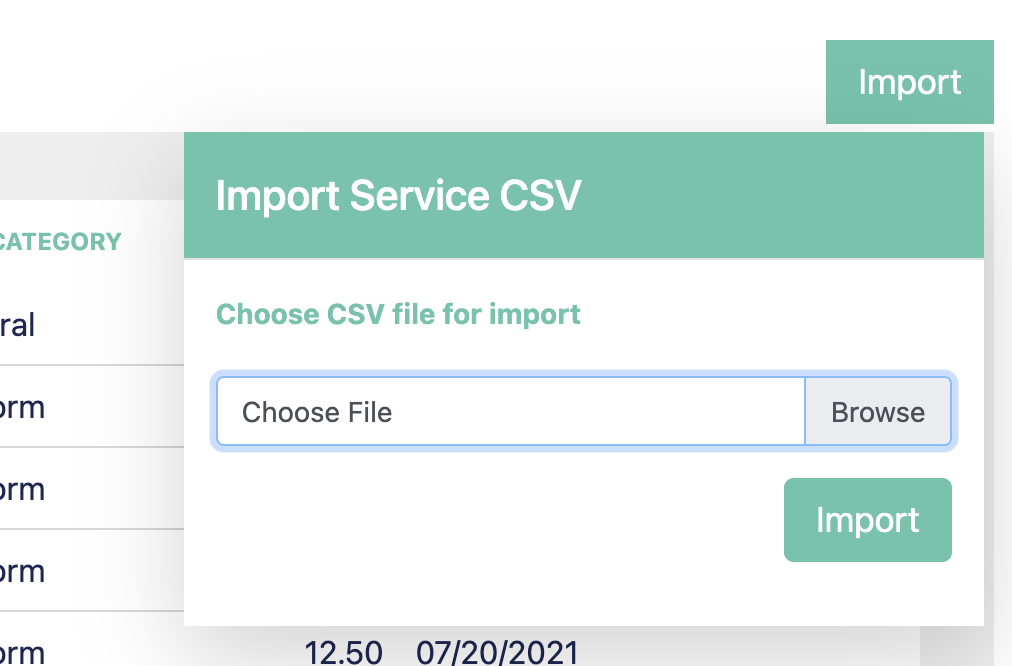
Step 4 – Importing a CSV
After you've updated or created your new services in your spreadsheet, you're ready for import. To import a CSV, navigate to either the Professional or Managed Services pages and click the Import button in the top right corner.
After selecting a file and clicking Import, the platform will bring you to a column assignment page. The page will show you the first five rows of your CSV to assist in aligning information to the appropriate column.
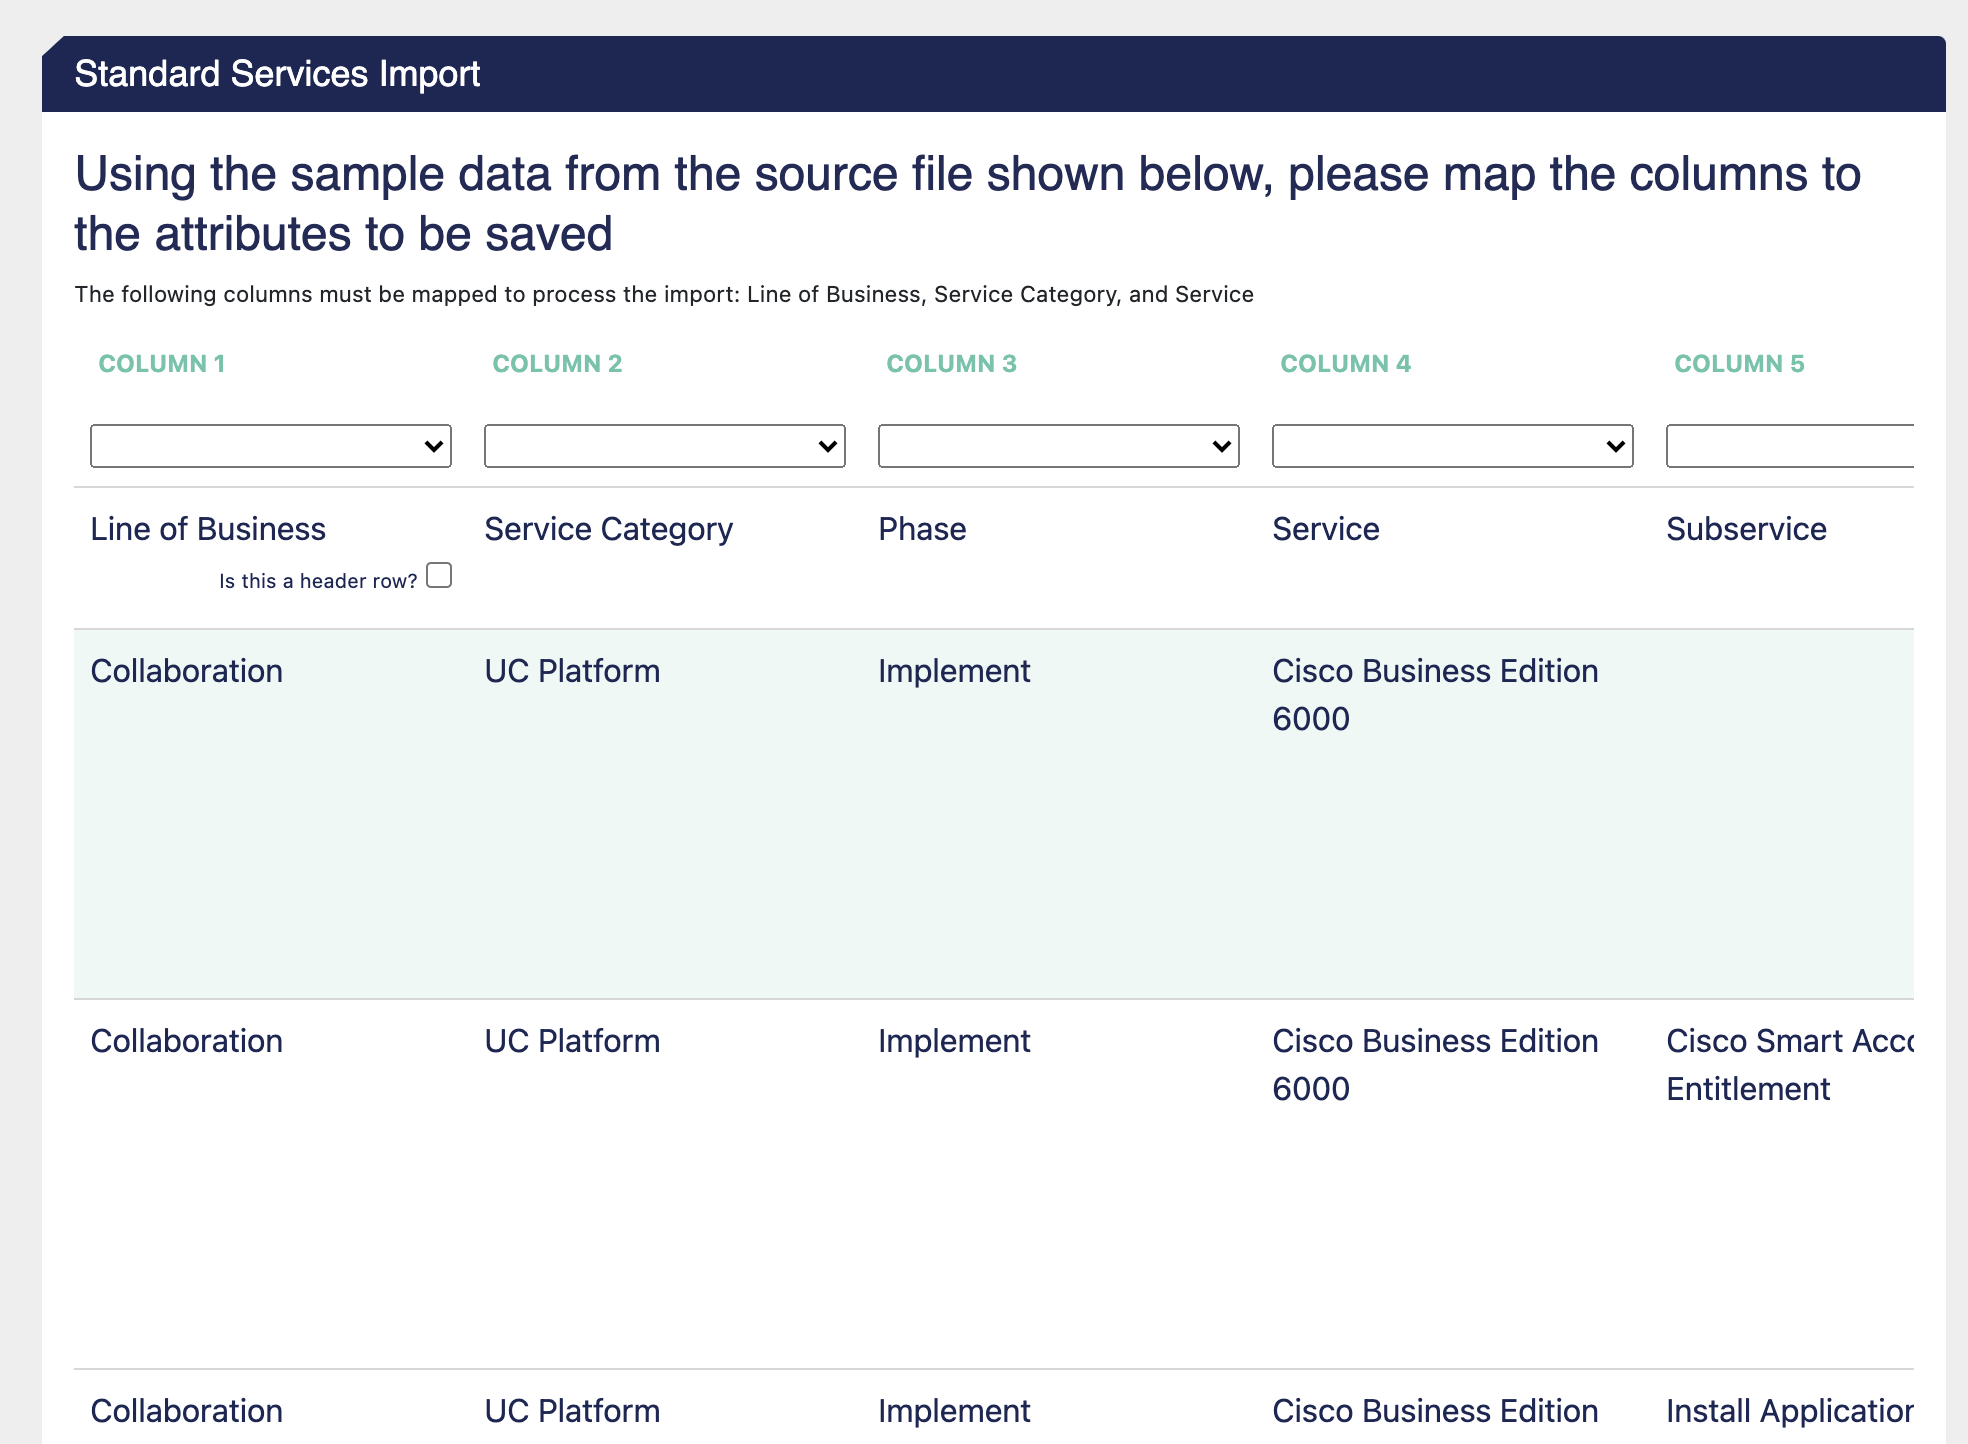
You can go ahead and go ahead and configure how you would like the platform to read your sheet here. You can align each Column to an attribute in ScopeStack using the dropdown menu on each Column.

Some additional things to know about this interface:
-
You can scroll right and left to view all the columns available to map via the uploaded CSV.
-
You can indicate if the first row is a header row via the checkbox. The platform will skip the first row during import if you check the box.
-
To continue with the import, you'll need to map the Line of Business, Service Category, and Service columns.
-
You can only map one attribute to one column.
-
You don't need to map every attribute to a column. The remaining attributes are optional, depending on what you want to import/update.
-
If you don't map an attribute and update a service, nothing will be changed about the unmapped attributes on the service you are updating.
-
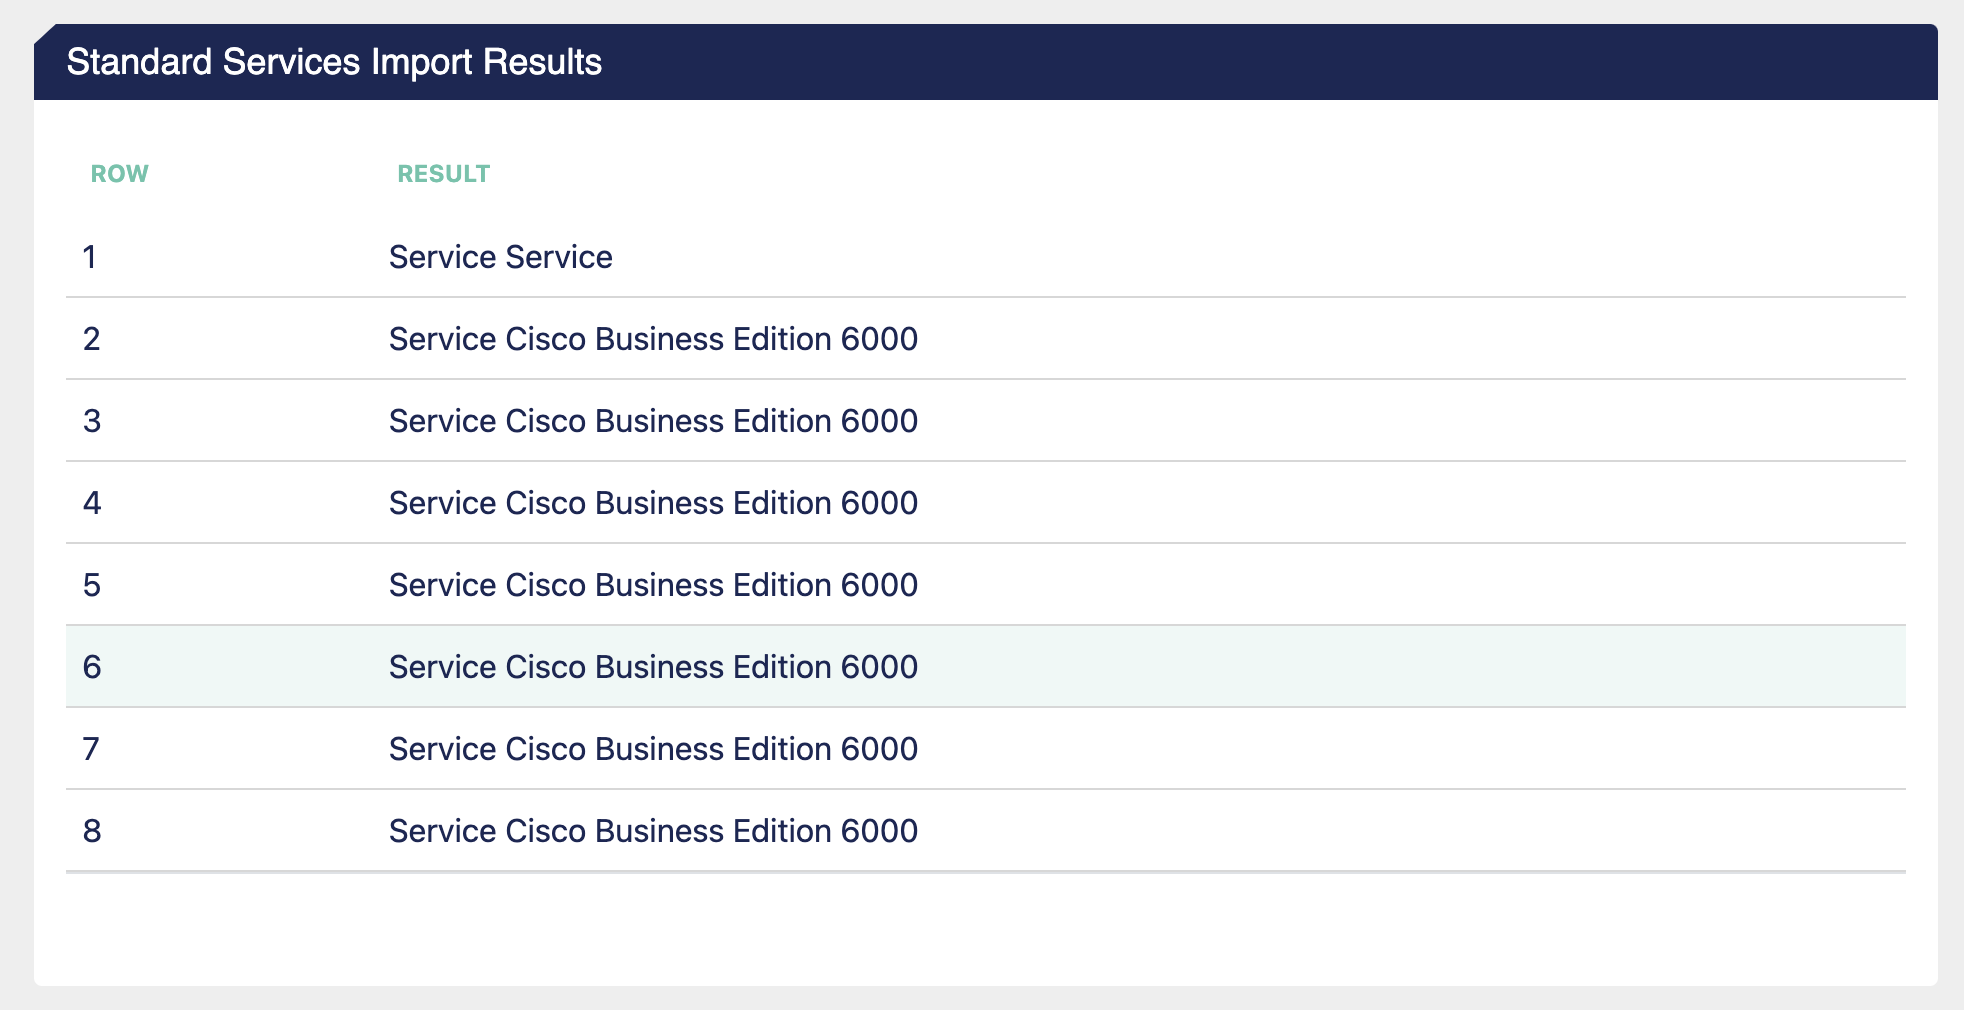
Step 5 – Process the Import
When ready, press the Process Import button at the bottom of the mapping dialogue. The platform will either inform you of an error or display the results of your import.
 Did this answer your question?