Schedule refresh times for your PowerBI integration to not worry about refreshing your bearer token.
Downloading the Power BI Template
You can download our Power BI Template for Paid & Sandbox Accounts here:
Note: These Power BI Templates are only compatible with Windows at this time. You can download Power BI Desktop on the Microsoft Store.
Downloading the Power BI ScopeStack Connector
There are two different Connectors for Power BI to communicate with the ScopeStack platform. One of these is for paid accounts and one of these is for Sandbox accounts. Download whichever fits the criteria of your account in ScopeStack.
Click Here for Paid Account's Connector
Click Here for Sandbox Account's Connector
Configuring your Connector
To allow this connector to communicate with ScopeStack you must first edit the connector file to have it communicate with both Power BI and ScopeStack.
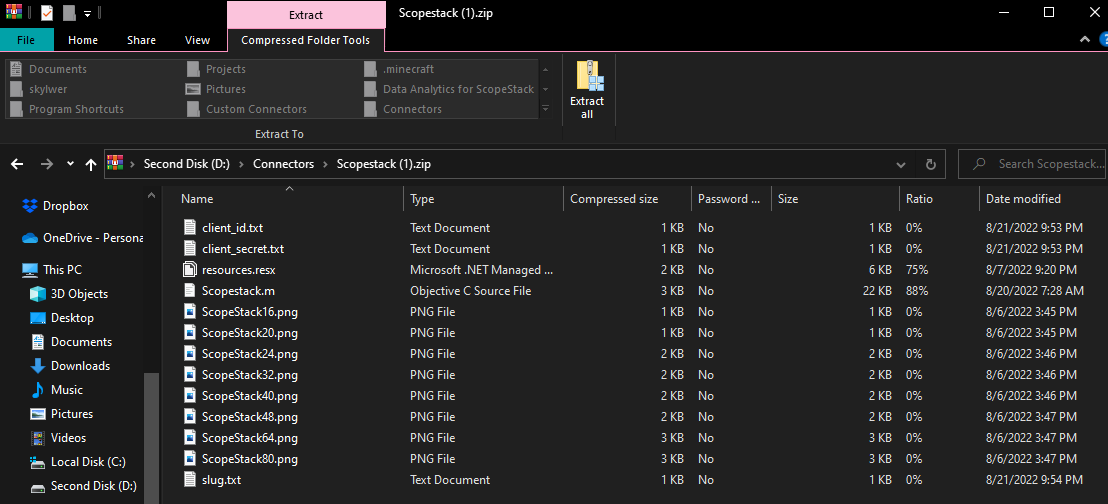
The custom connector is a group of different files zipped into a .mez file. Before editing this, you will need to have the client_id, client_secret, and your account's slug from ScopeStack.
All users will use the same client_id and client_secret:
-
Client_id: vJif5-aHqA8fYUgm_x6oaO4DtI4yOlFOgYvRYVGd1ys
-
Client_secret: mC0olisDq5oo9nSS1i0sD-xs39099si4v0uVpSCjleU
Follow these steps to enable the connector to access your ScopeStack data:
-
Change the file extension from Scopestack.mez or ScopestackSandbox.mez to .zip.
-
We recommend you make a copy of the original file in the event that you need to roll back any changes.
-
-
Inside this zip file, you will find the required files for the connector to access your data in ScopeStack.
-
Open slug.txt, client_id.txt, and client_secret.txt and change the placeholder text to the necessary values indicated earlier.
-
Navigate to the parent folder.
-
Change the file extension back from .zip back to .mez.
Linking your Connector to Power BI Desktop
To make the connector available to Power BI Desktop, copy your modified Scopestack.mez or ScopestackSandbox.mez connector file to this folder:
"C:\Users\<your user name>\Documents\Microsoft Power BI Desktop\Custom Connectors".
Note: If you do not have these folders, create them now.
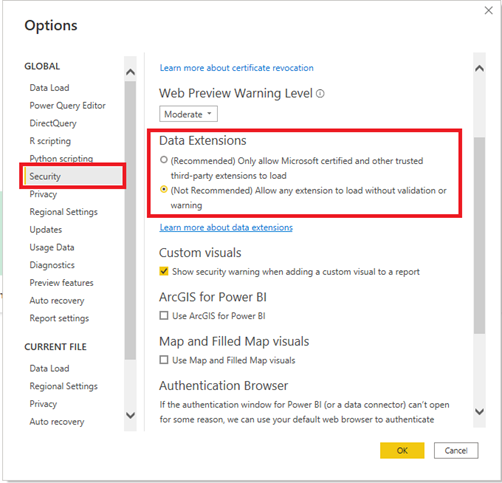
After doing this, open Power BI Desktop and navigate to your Options menu under the File ribbon. Under the Security tab, enable "Allow any extension to load without validation or warning." This will allow Power BI to see your Custom Connector in the folder you created earlier.
Installing and Configuring a Gateway
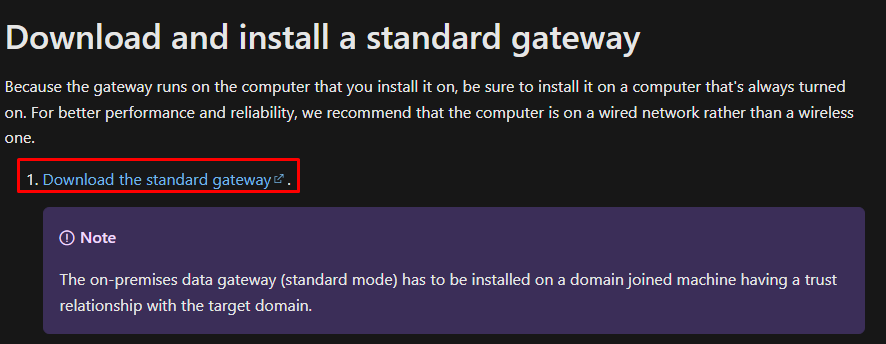
The Power BI Gateway is a tunnel that allows the Power BI Service to access on-premises data sources so that your reports can be refreshed with current data. You will need to have a Gateway installed to use your custom connector.
Note: The Standard gateway is the recommended installation to make sure that there are no interruptions or issues. You can find the download link below under the "Installing a Gateway" link.
Here are some links to documentation regarding Power BI Gateways:
-
What is a Gateway: On-premises data gateway - Power BI | Microsoft Docs
-
Installing a Gateway: Install an on-premises data gateway | Microsoft Docs
-
Configuring a Gateway: Use the on-premises data gateway app | Microsoft Docs
After installing the On-premises data gateway application, follow these steps:
Copy your updated connector to the folder your Gateway will be looking to find your custom connector(s).
Example: My connector folder is located where I placed my Connector earlier.
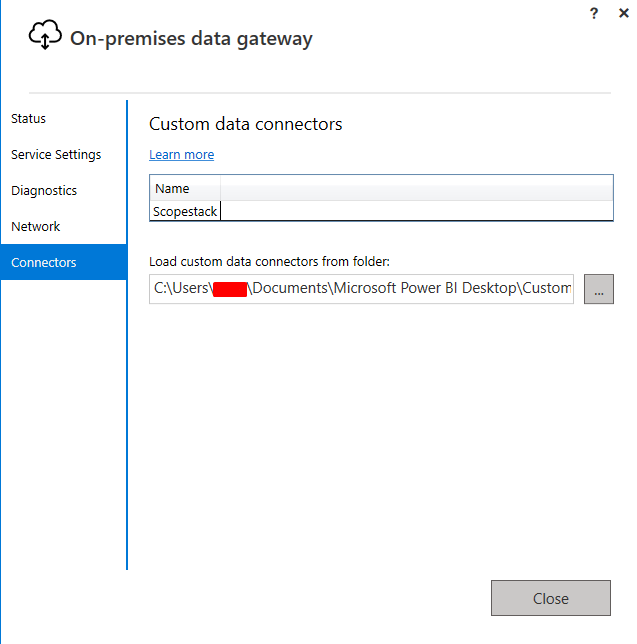
After you’ve copied your connector to this folder, open the On-premises data gateway application and validate that the connector is installed and recognized:
Note: You may need to restart the gateway under the Service Settings tab to get your connector recognized.
Linking your Gateway to Power BI
Note: To complete the next steps you will need to be an administrator for the Power BI Service.
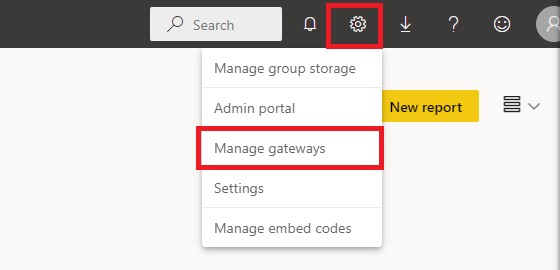
First, log in to Power BI. At the top right of your page click the gear icon and navigate to the Manage gateways page.
Next, you will click the + New button at the top to add a new Gateway to your account.

Here you will select your Gateway's name under the "Gateway cluster name" and name anything under the Data source name section.
In the Data source type drop-down, you should see your connector (either ScopeStack or ScopestackSandbox.)
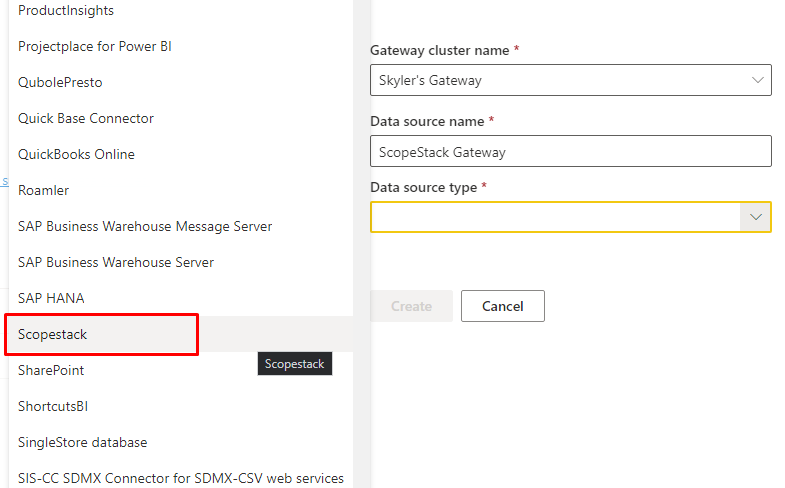
Next, for the Authentication section, select OAuth2 and click Edit credentials. This will open the ScopeStack login. Sign in with your ScopeStack account.
Note: If you are already logged into ScopeStack it may automatically close shortly after you click Edit credentials.
After selecting your desired privacy level, you can click the Create button to create the gateway connection in Power BI.
Uploading your Dataset to Power BI
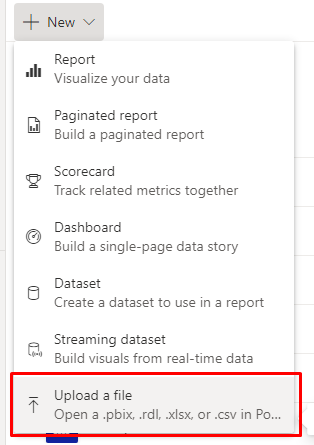
After you have connected your gateway to Power BI navigate to your Workspace to upload the template file. Under the + New button upload the Power BI template you downloaded earlier.
After this has been uploaded, click the three dots next to the dataset and navigate to Settings.
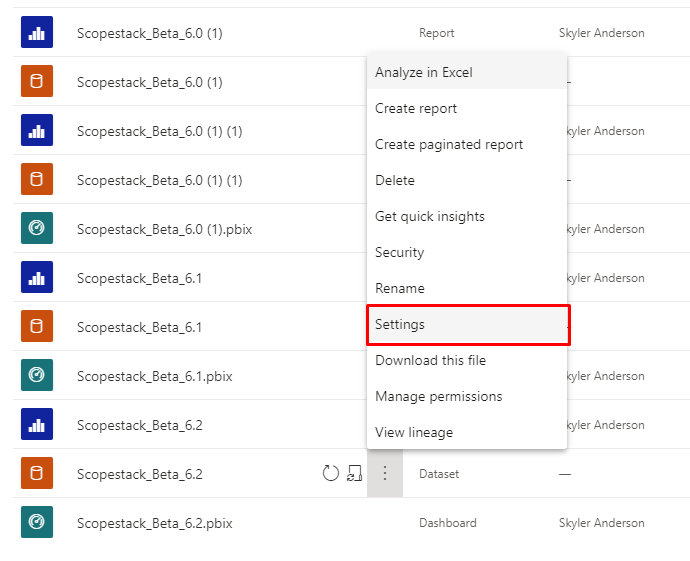
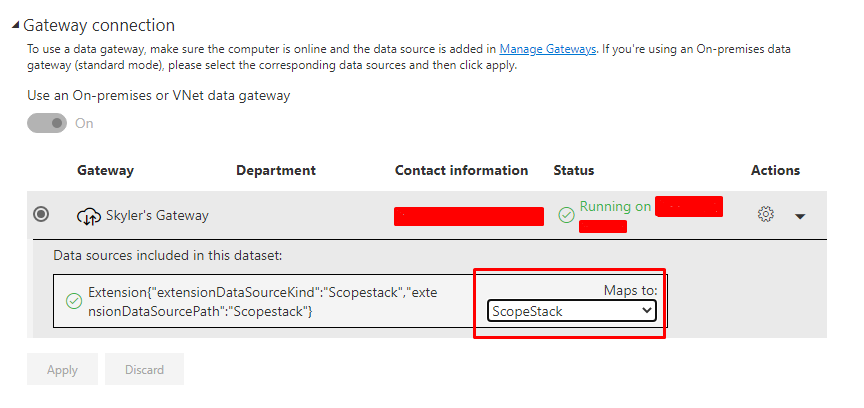
Under Gateway Connection, select your data source to map to the Gateway that you connected earlier.
Setting up a Scheduled Refresh for your Dataset
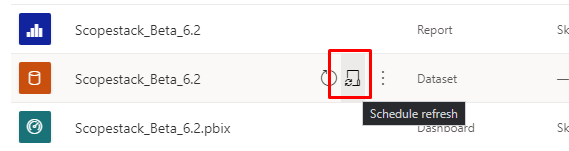
To set up a scheduled refresh time for your dataset, click the Schedule Refresh button next to the dataset in your Workspace.
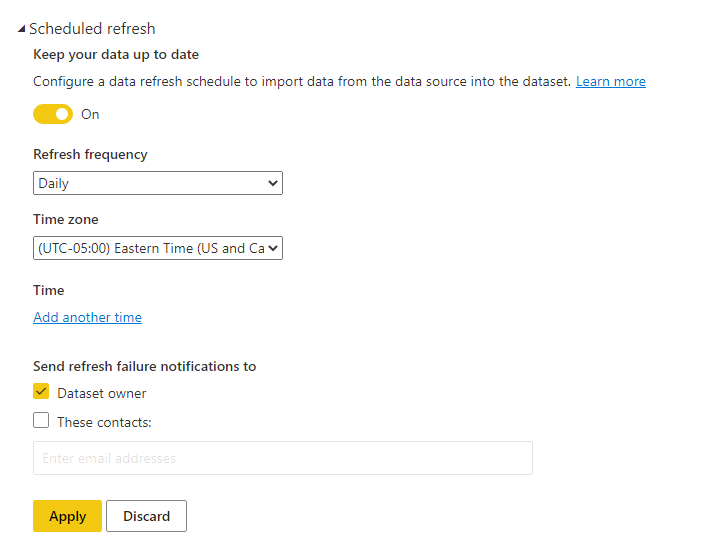
Here you can select specific frequencies, days, and times that your dataset will refresh automatically for you.
Refreshing your Dataset in Power BI Desktop
To refresh your dataset manually in the Power BI Desktop app click the Refresh button at the top of the page.

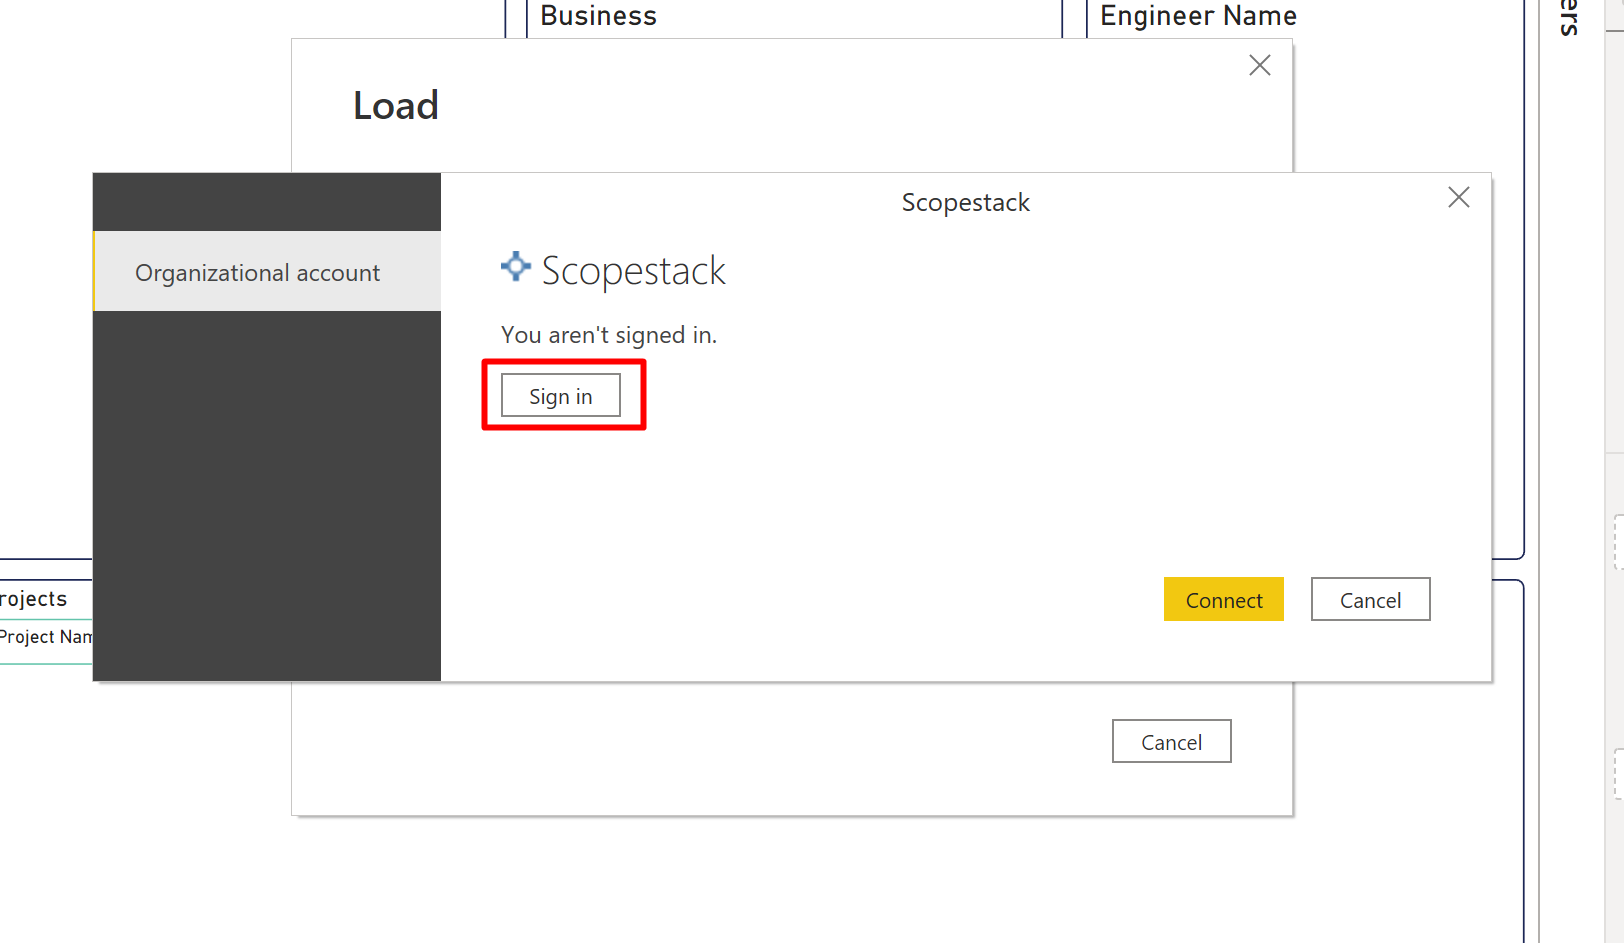
The first time you do this you will be asked to sign in with ScopeStack. After doing this, you can refresh your dataset at any point while working with the template.
Congratulations on setting up your Power BI template to integrate with your ScopeStack account!
Did this answer your question?